
Running a content operation without a centralized calendar is like trying to conduct an orchestra where nobody has the sheet music. Posts get missed, deadlines blur together, and your team wastes hours asking "who's handling what?" An Asana content calendar template solves this by giving every piece of content, from ideation to publication, a clear home and timeline inside a tool your team already knows.
This guide walks you through setting up a content calendar in Asana step by step, whether you're managing a social media pipeline, a blog editorial schedule, or both. You'll get a practical framework you can customize to fit your workflow, plus tips for structuring projects so nothing falls through the cracks. At SocialRevver, we build data-driven content systems for founders and business owners who need their short-form video production to run like clockwork, and a well-structured calendar is the backbone of every system we operate. The principles here apply whether you're coordinating a two-person team or an entire content department.
By the end, you'll have a fully functional Asana calendar ready to keep your team aligned and your publishing schedule consistent, no more guesswork, no more bottlenecks.
What you need before you start in Asana
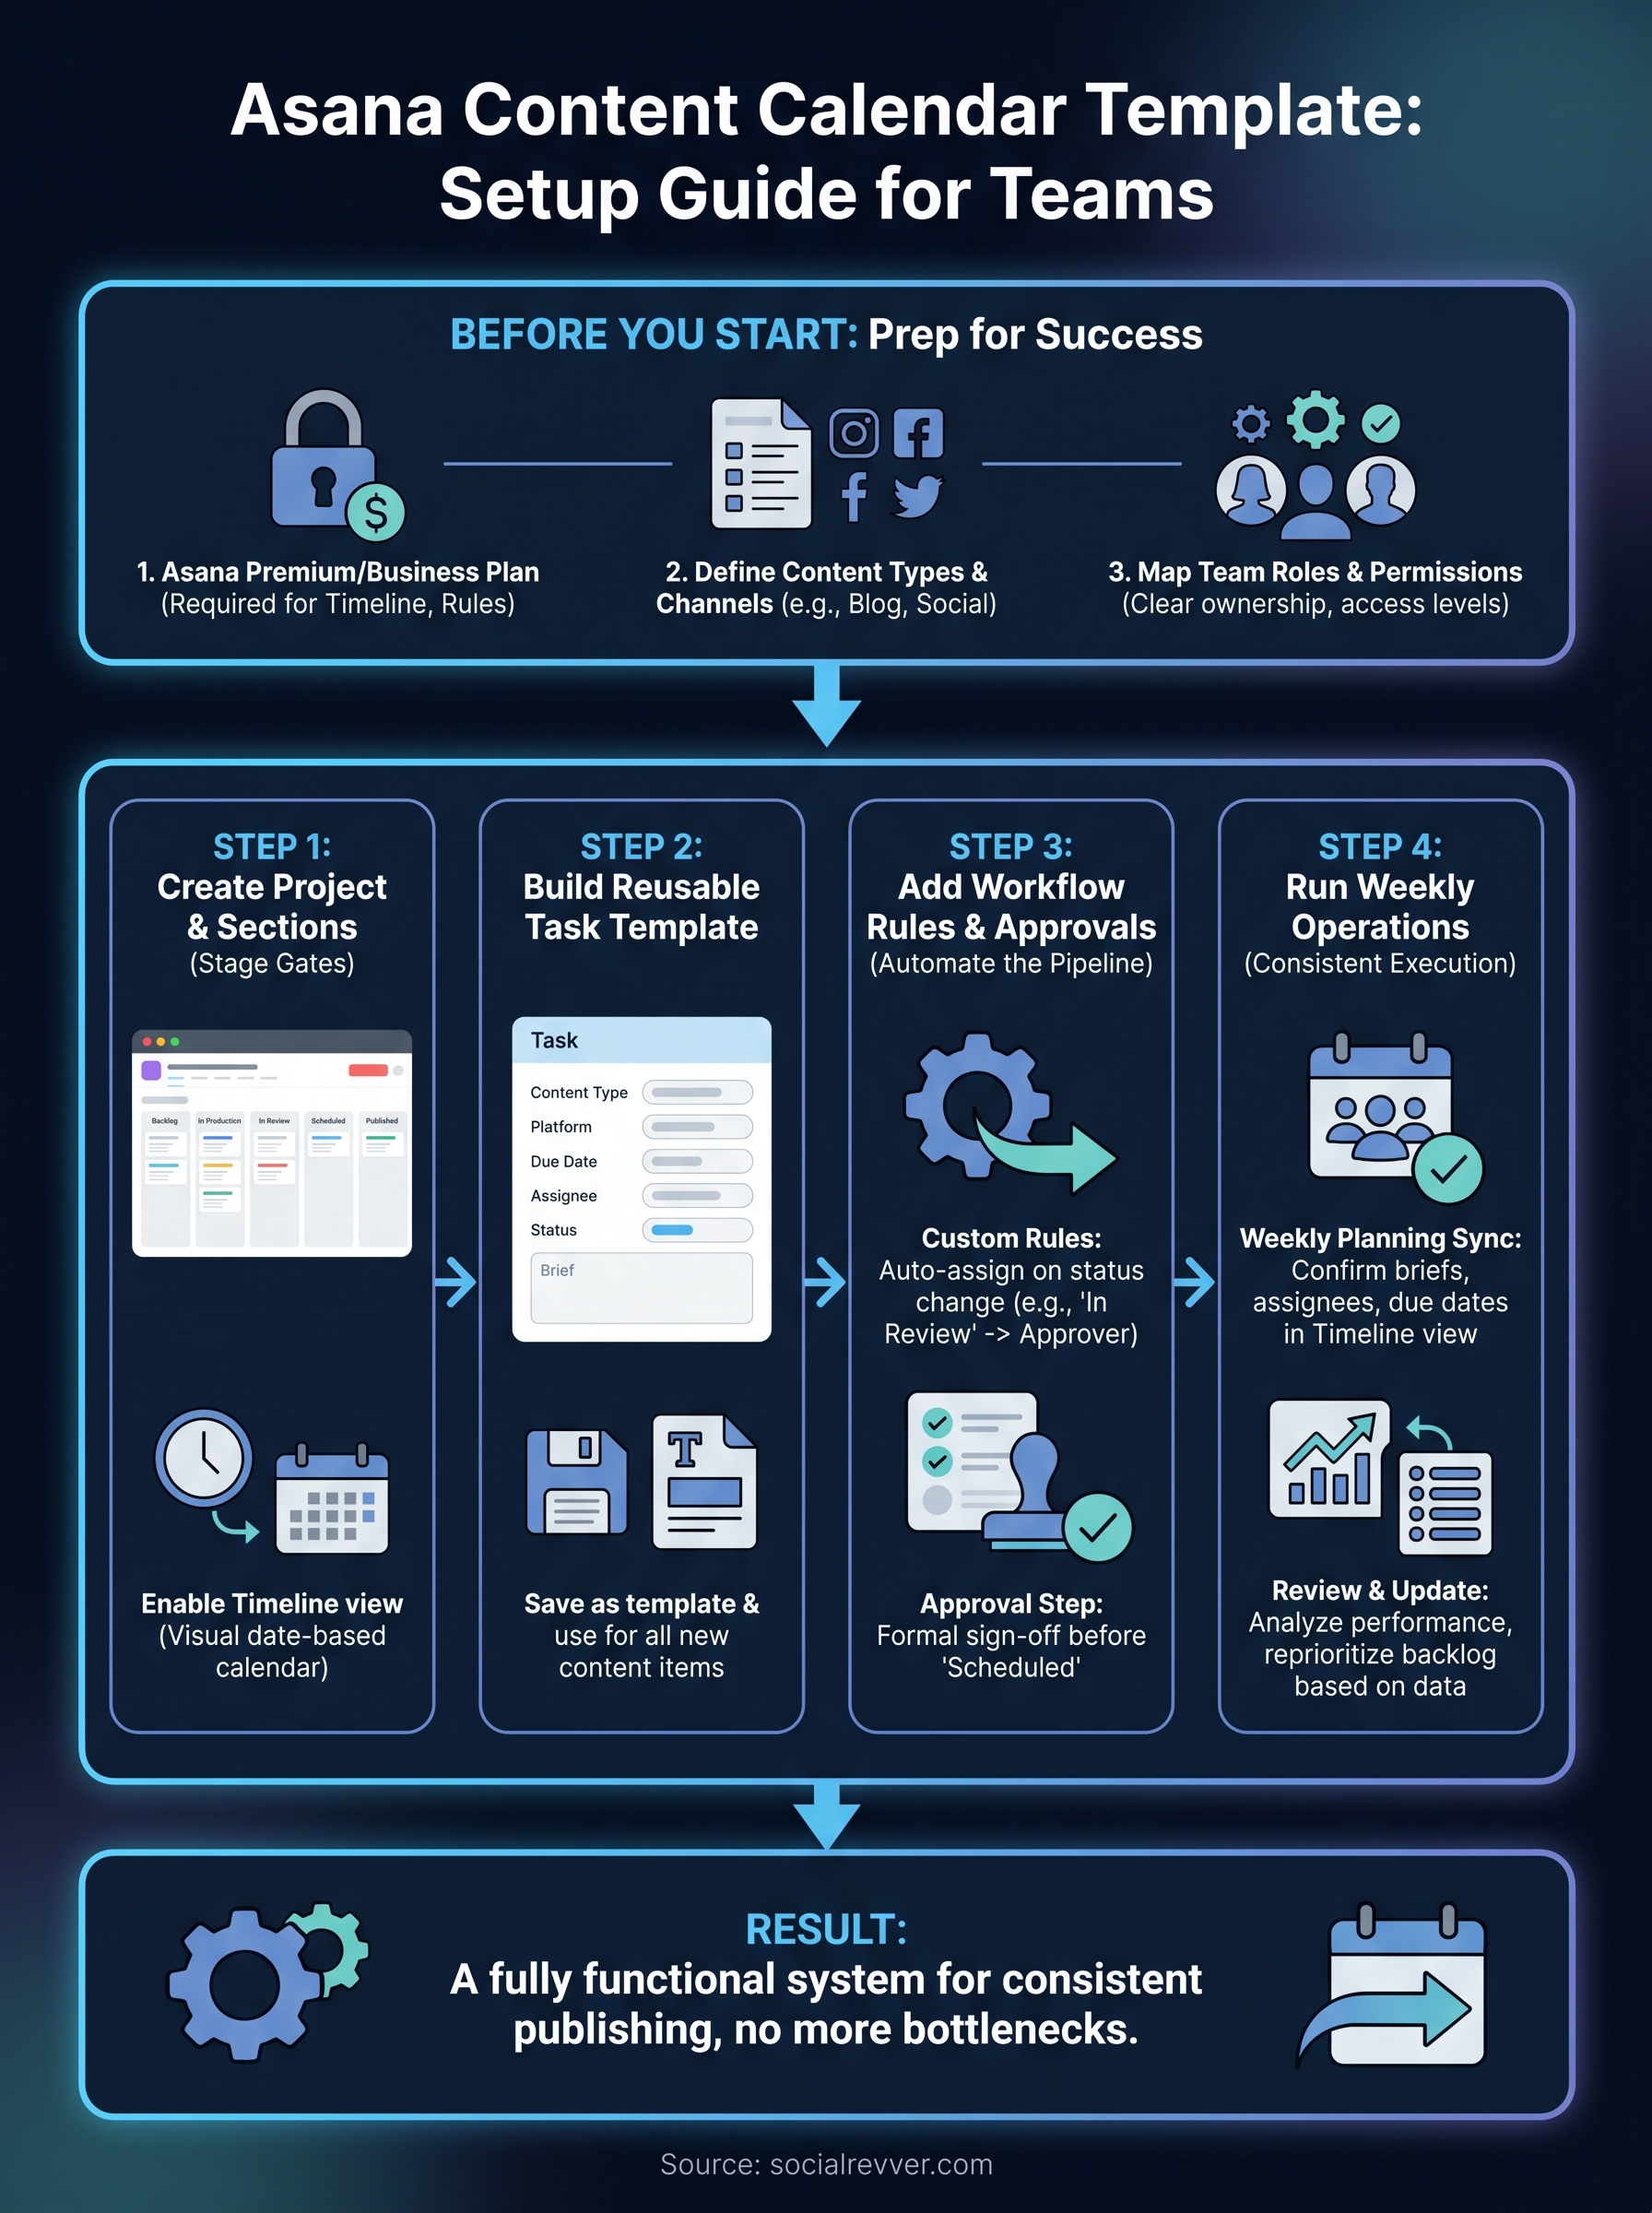
Setting up an Asana content calendar template takes less than an hour if you walk in prepared. Rushing into the build without the right plan, permissions, and content structure defined upfront forces you to tear things down and rebuild later. Spend 20 minutes on the prerequisites below and the rest of the setup becomes straightforward and fast.
Choose the right Asana plan
Asana's free tier gives you basic task and project management, but a functional content calendar requires features from the Premium or Business plan. Timeline view, custom fields, and automated rules are all locked behind paid tiers. Timeline view is the feature that turns a flat task list into an actual visual calendar, so it's non-negotiable for this setup. Confirm your current plan before you start building so you don't hit a paywall halfway through.
Without Timeline view, you're managing a task list, not a calendar.
Define your content types and channels
Before you create a single task in Asana, write down every content format your team produces and every platform or channel you publish to. This list becomes the foundation for your custom fields and project sections. Skipping this step results in a generic board that doesn't match how your team actually works, and you'll spend more time reorganizing than publishing.
Here's a quick example of what that list might look like:
| Content Type | Channel | Typical Frequency |
|---|---|---|
| Short-form video | Instagram Reels, TikTok | 5x per week |
| Long-form blog post | Website | 2x per month |
| Newsletter | 1x per week | |
| Carousel | 2x per week |
Map out team roles before you build
Every person who touches a piece of content needs a clearly defined role in your Asana workspace before you build the project structure. At minimum, identify who handles writing, design, review, and final approval. When roles are ambiguous, tasks stall because nobody knows who's responsible for moving them forward.
Confirm that each team member also has the correct workspace access level in Asana. Full members can edit and create tasks, while guests have limited, view-and-comment access. If your freelance editor or external reviewer needs to leave feedback on drafts, add them as a guest now so you aren't chasing permissions after the project is live.
Step 1. Create your content calendar project
With your content types, channels, and team roles mapped out, you're ready to build inside Asana. This is where your Asana content calendar template takes physical shape. Log into your workspace and create a new blank project, then name it something your whole team will recognize instantly, like "Content Calendar 2026" or "Editorial Pipeline." Avoid vague names like "Content Stuff" because clarity in naming saves time when multiple projects live in the same workspace.
Set up your project sections
Sections act as the stage gates every piece of content moves through. Think of them as columns that represent your editorial workflow from start to finish. Set up your sections to reflect the actual steps your team takes, not some generic template.

Here's a recommended starting structure:
| Section Name | Purpose |
|---|---|
| Backlog | Ideas not yet scheduled |
| In Production | Actively being written or filmed |
| In Review | Waiting on feedback or approval |
| Scheduled | Approved and queued for publishing |
| Published | Live and tracked for performance |
You can add or remove stages based on your team's specific process, but keep the list tight. Too many stages create friction rather than clarity.
More than six sections usually signals a workflow problem, not a structure problem.
Enable Timeline view
Once your sections exist, switch to Timeline view by clicking the view selector at the top of your project. This turns your task list into a visual date-based calendar so you can spot gaps, overlaps, and overloaded weeks at a glance. Drag tasks directly on the timeline to adjust publish dates without opening each task individually, which saves meaningful time during weekly planning.
Step 2. Build a reusable content item template
Creating individual tasks from scratch every time you add a piece of content is a significant time drain. Instead, build a reusable task template inside your Asana project so every new content item starts with the same consistent structure. This is where your Asana content calendar template shifts from a static board into a repeatable production system.
Define the fields each content task needs
Every content task in your calendar should carry the same core set of information so anyone on your team can pick it up without asking questions. In Asana, you configure this by adding custom fields to the task template and filling in default values where they apply. Open a new task and add the following fields before you save it as a template:
| Field | Type | Purpose |
|---|---|---|
| Content Type | Dropdown | Video, blog post, newsletter, carousel |
| Platform | Dropdown | TikTok, LinkedIn, website, email |
| Due Date | Date | Final publish deadline |
| Assignee | Person | Who owns this task |
| Status | Dropdown | Mirrors your section stages |
| Brief | Text | One-sentence description of the angle or topic |
A task without a clear brief forces your team to start every assignment by guessing, which kills speed.
Save and apply the template
Once your task fields are set, click the three-dot menu on the task and select "Save as template." Name it clearly, such as "Standard Content Task," so every team member finds it without confusion. From that point forward, whenever you add a new content item to your calendar, click "Add task from template" instead of creating a blank task. This ensures every piece of content enters your pipeline already structured and ready to move.
Step 3. Add workflow fields, rules, and approvals
Your task template already carries the core fields, but the workflow logic that moves tasks automatically and routes approvals is what turns your Asana content calendar template from a passive list into an active system. This step layers automation and accountability on top of the structure you built in Steps 1 and 2.
Set up custom rules to automate status changes
Asana's Rules feature lets you trigger automatic actions when a task meets a specific condition, so your team spends less time manually updating statuses. Access Rules by clicking "Customize" in the top-right corner of your project, then select "Rules." Build rules that handle the repetitive handoffs for you:
| Trigger | Action |
|---|---|
| Task moved to "In Review" | Automatically assign to designated approver |
| Due date passes with no completion | Add "Overdue" tag and notify assignee |
| Task moved to "Published" | Mark complete and notify project lead |
Automating status changes removes the most common bottleneck in content pipelines: tasks that stall because nobody remembered to reassign them.
Add an approval step for final sign-off
Before any content moves to "Scheduled," it needs a formal sign-off from the right person. Asana's built-in Approval task type lets you convert a subtask into an approval request with a single click. Inside your content task template, add a subtask called "Final Approval," set its type to "Approval," and assign it to whoever holds final editorial authority on your team. When the approver marks it approved, the parent task moves forward. When they request changes, the assignee gets notified immediately and knows exactly what to fix before resubmitting.
Step 4. Run the calendar week to week as a team
Building your Asana content calendar template is only valuable if your team uses it consistently. The real test comes during weekly operations, when deadlines stack up, priorities shift, and you need a system that holds without constant manual intervention. Set a recurring weekly check-in tied directly to your Asana calendar so the tool drives the meeting, not the other way around.
Run a weekly planning session in Asana
Schedule a 30-minute team sync at the start of each week and open your Timeline view as the single source of truth. During this session, confirm that every piece of content scheduled for the next seven days has a completed brief, an assigned owner, and a realistic due date. Any task missing one of these three elements gets flagged before production begins, not after.
A planning session that runs from the calendar prevents the last-minute scrambles that cause teams to miss publish dates.
Pull any backlog ideas forward if your publishing slots have gaps. Assign them, attach briefs, and move them into "In Production" before the meeting ends so the week starts with a clean, actionable board.
Review performance and update the backlog
At the end of each week, spend 15 minutes reviewing what published and how it performed. Log basic performance data, such as views, clicks, or leads generated, as a comment on the completed task so your team builds an internal reference over time. Then look at your backlog section and reprioritize based on what the data shows you. Content that aligns with your top-performing formats and topics moves to the front of the queue for the following week, so your calendar keeps improving rather than just repeating.
Next Steps
You now have everything you need to build and run a fully functional Asana content calendar template from scratch. You've set up your project structure, built a reusable task template, added automation rules, and established a weekly operating rhythm that keeps your team accountable and your publishing schedule consistent.
The next move is to put it into practice. Open Asana today, create your project, and populate your first two weeks of content before your next team meeting. A calendar that exists only in theory produces nothing. Start with your existing content backlog and work forward from there so you build the habit of managing everything through a single system.
If you want a production system that goes beyond calendar management and turns your short-form content into consistent inbound leads, apply to work with our team and get a free 40+ slide social media strategy built specifically for your brand.