The Canva content planner is one of those features that sounds simple on paper, schedule posts, pick dates, hit publish, but actually saves hours of manual work once you set it up correctly. For solopreneurs, small teams, or anyone managing multiple social accounts without a dedicated content ops team, it's a solid free tool that handles both design and distribution in one place.
That said, scheduling posts is just one piece of the puzzle. At SocialRevver, we build full content systems that go well beyond scheduling, covering strategy, scripting, production, and distribution optimization driven by data. But we also know that not every brand is at that stage yet, and tools like Canva's planner can be a great starting point for getting consistent with your posting.
This guide walks you through exactly how to plan and schedule social media posts using Canva in 2026, step by step, with no fluff. You'll learn how to set up your calendar, connect your accounts, schedule content, and get the most out of the platform's built-in planning features.
What Canva Content Planner does in 2026
Canva's built-in scheduling tool has grown significantly over the past few years. The Canva content planner now functions as a centralized hub where you can design, organize, and publish content across multiple social platforms without switching between apps. Instead of exporting a graphic and uploading it to a separate scheduler, you handle the entire workflow inside Canva's interface, from creating the post to setting the exact date and time it goes live.
Core scheduling features
The planner gives you a visual calendar view where you can see all your scheduled posts at a glance. Each post tile shows a thumbnail of your design, the platform it's targeting, and the scheduled time, which makes it easy to spot gaps in your posting cadence before they become a problem. You can drag posts to new dates directly in the calendar, adjust times without reopening the editor, and duplicate posts across multiple platforms in a few clicks.
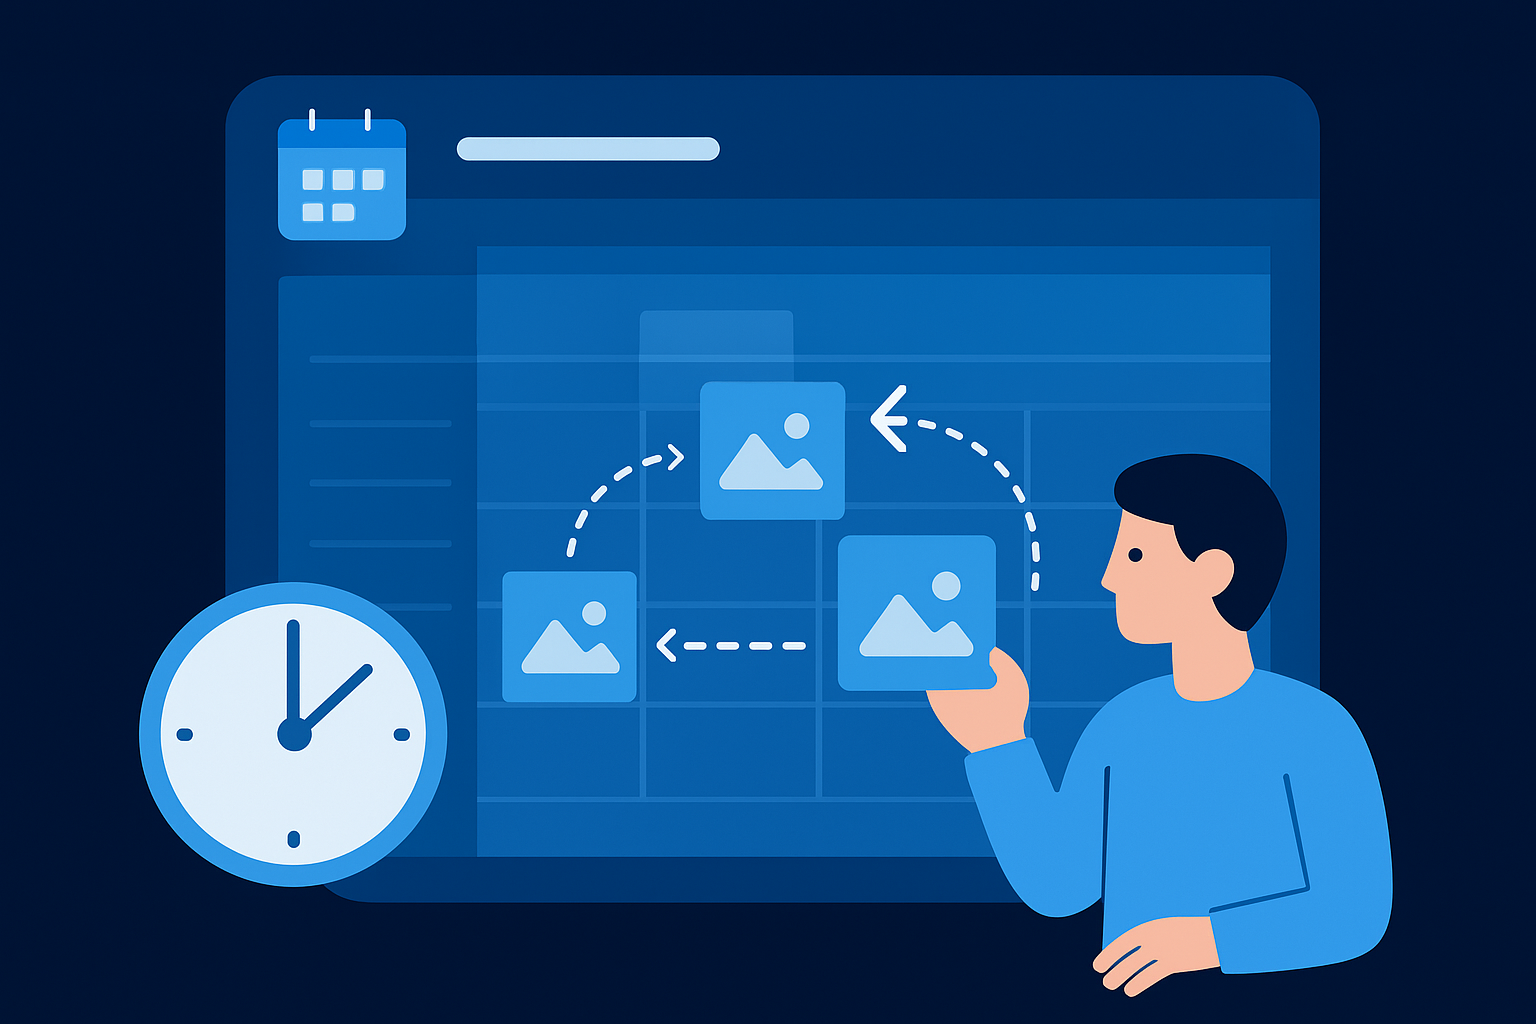
Seeing your full content calendar as a visual grid, rather than a list, is genuinely useful for planning content themes across several weeks at once.
Here's a quick look at the main scheduling actions available in the planner:
- Create and schedule posts from your design canvas or directly from the calendar view
- Reschedule by dragging tiles to a new date and time
- Duplicate a post to publish across multiple platforms simultaneously
- Preview how a post will look before it goes live
- Edit or delete scheduled posts without losing the original design file
Platform support and native integrations
As of 2026, Canva supports direct scheduling to several major platforms through its native integrations. Each connection requires you to authenticate your account inside Canva's settings, which takes about two minutes per platform. You stay logged in until you manually disconnect or the token expires, which can happen if you change your password on the connected platform.
| Platform | Post types supported |
|---|---|
| Instagram (personal and business) | Feed posts, Reels |
| Facebook (pages and groups) | Posts, images, video |
| LinkedIn (personal and company pages) | Posts, images |
| Pins | |
| Twitter / X | Posts with images |
| Slack | Messages to channels |
| Tumblr | Posts |
Business and Teams plan users get priority access to scheduling features and higher monthly post limits, while free plan users can still schedule a limited number of posts per month across connected accounts.
What it doesn't do
Understanding the limits of the tool matters before you build a workflow around it. The planner does not support TikTok scheduling natively as of 2026, which is a significant gap if short-form vertical video is your primary content format. For TikTok, you still need to publish manually or route content through a third-party tool that supports the platform's API.
The planner also does not provide performance analytics inside the calendar view. You can see what was scheduled and when it was posted, but you won't find reach, impressions, or engagement data anywhere within Canva itself. If you want to connect publishing activity to actual results, you'll need to pull that data from each platform's native analytics dashboard separately. The scheduling function is genuinely useful for staying consistent, but it operates as a publishing tool only, not a full content intelligence system with feedback loops built in.
Before you start: access, accounts, and assets
Before you touch the Canva content planner, spend ten minutes confirming your setup is actually ready. Jumping straight into scheduling without checking your plan tier, connected accounts, and brand assets leads to interrupted workflows, missing permissions, and posts that fail to publish at the worst possible time.
Check your plan level
Free plan users can access the content planner and schedule a limited number of posts per month, but that cap becomes a real bottleneck if you're posting daily across multiple channels. The Canva Pro or Teams plan removes most of those limits and unlocks priority scheduling features across the board.
Here's a quick comparison to help you decide whether your current plan fits your posting volume:
| Plan | Scheduling access | Monthly post limit |
|---|---|---|
| Free | Yes, limited | Low cap (varies) |
| Pro | Full access | Higher, fewer restrictions |
| Teams | Full access (admin-controlled) | Workspace-level limits apply |
If you're on a Teams plan, your workspace admin controls which features are enabled, so verify with them before assuming you have full scheduling access.
Gather your brand assets
Your posts will go out faster and look more consistent if your Brand Kit is fully loaded before you start scheduling. Inside Canva, the Brand Kit stores your logo files, brand colors as hex codes, and approved fonts. Go to Brand Hub from the left sidebar and upload everything there before you build a single post.
Here's a checklist of what to have ready before you schedule your first post:
- Logo files in PNG format with a transparent background
- Brand color hex codes covering your primary and secondary palette
- Approved fonts uploaded under Brand Hub if you use custom typefaces
- A folder of pre-approved images or video clips organized by campaign or content theme
- Caption copy drafted in advance, stored in a shared doc your team can access
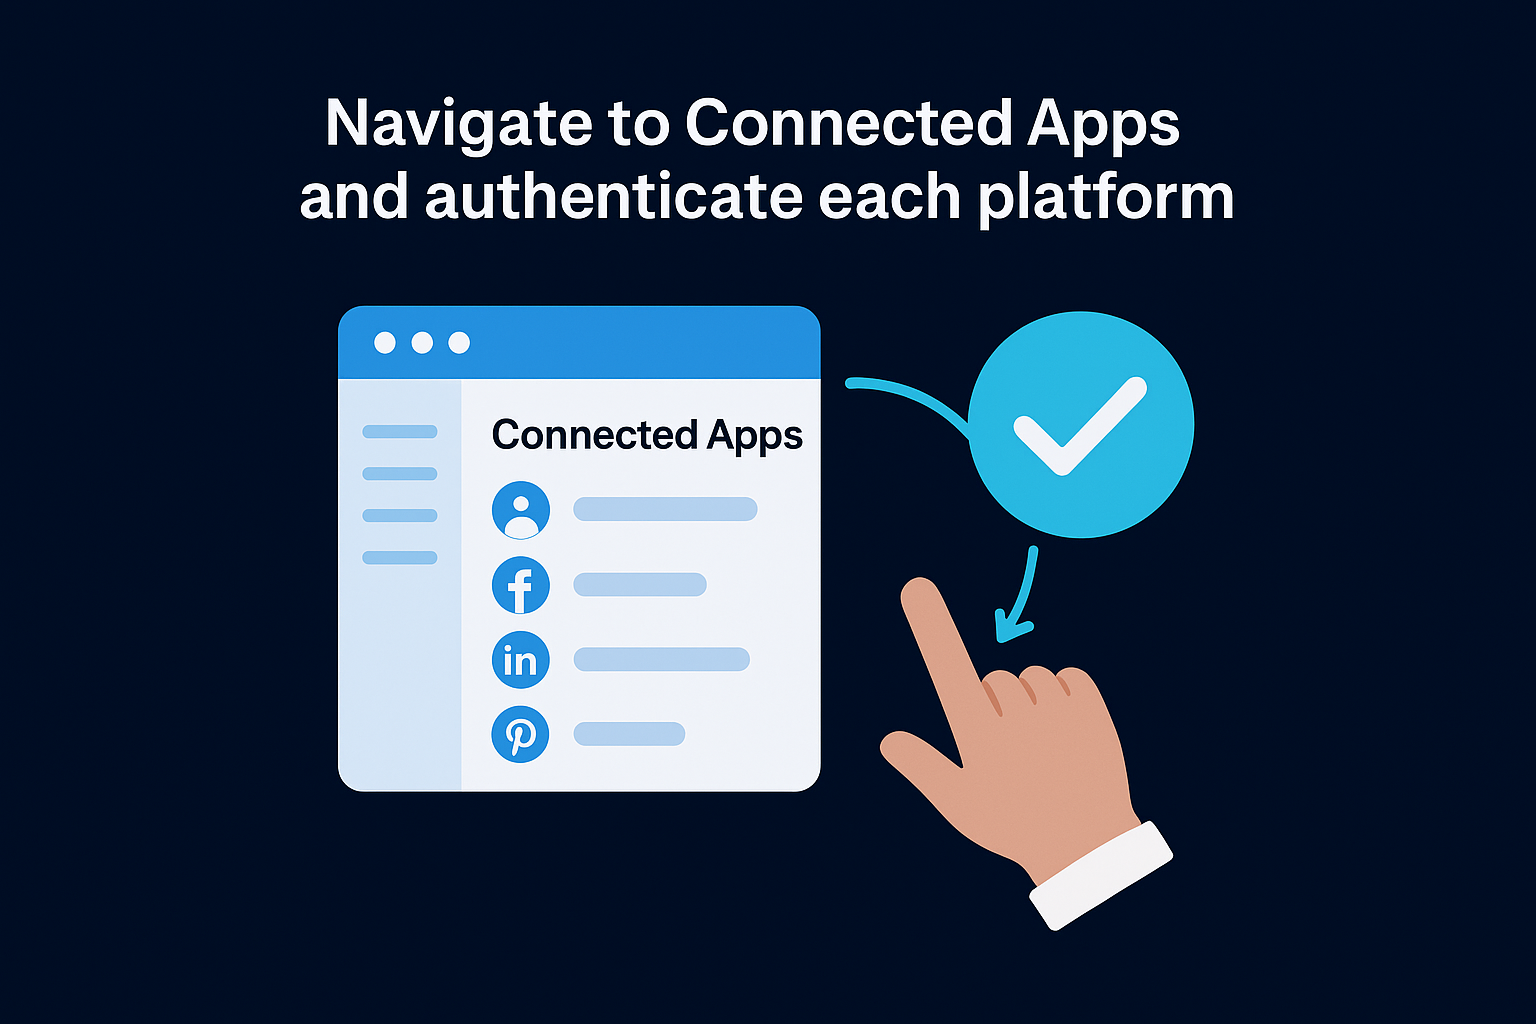
Verify platform account access
Each social account you plan to schedule to must be connected inside Canva before you can assign posts to it in the calendar. Go to Settings, then Connected Apps, and authenticate each platform individually. Make sure you're logging in with the correct account credentials for each one, since connecting a personal Instagram account instead of a business account will limit your available post types and may block scheduling entirely.
Platform tokens expire over time. If you connected accounts in the past and haven't used them recently, reconnect each one now to avoid silent publish failures once you start scheduling.
Step 1. Set up your calendar and posting system
Before you schedule a single post, you need to orient yourself inside the tool and define the posting rhythm you're actually going to maintain. Opening the Canva content planner without a plan in place usually results in scattered content with no structure, which defeats the point of using a calendar at all.
Open the content planner
Log into Canva and click the grid icon labeled "Content Planner" in the left sidebar of your homepage. If you don't see it immediately, look under the "More" option in the sidebar menu. The planner opens as a full calendar view, showing the current month with any previously scheduled posts already visible as thumbnails on their assigned dates.
Spending two minutes clicking around the calendar interface before you add anything will save you from making scheduling mistakes later, especially around time zone settings.
Click the settings icon inside the planner and confirm your time zone matches the location of your primary audience. If you're a US-based brand targeting US audiences, this should already default to your local time, but verify it, since a misconfigured time zone will push posts out at the wrong hour without any warning.
Build your posting frequency plan
Your calendar is only useful if you commit to a realistic posting schedule before filling it in. Decide upfront how many posts you plan to publish per week, on which platforms, and at what times. Then map that cadence onto the calendar as a repeating structure so you can see your week at a glance before any designs are added.
Use this template as a starting point for a consistent five-day posting week:
| Day | Platform | Post type | Target time |
|---|---|---|---|
| Monday | Thought leadership | 8:00 AM | |
| Tuesday | Carousel or image | 12:00 PM | |
| Wednesday | Engagement post | 10:00 AM | |
| Thursday | Case study or tip | 8:00 AM | |
| Friday | Behind-the-scenes | 5:00 PM |
Name and organize your content themes
Once your posting frequency is locked, assign a content theme to each posting slot. Themes give your calendar a backbone, so instead of deciding what to post each week from scratch, you're filling in a structure that already exists. Label each day or slot with a theme like "Authority Content," "Product Story," or "Community Engagement" directly inside your planning notes or a companion spreadsheet you keep open alongside Canva. This makes it significantly easier to batch-create designs for the entire month in one focused session.
Step 2. Connect your social channels the right way
Connecting your social accounts is the step most people rush through, then regret later when posts fail silently or publish to the wrong account. The Canva content planner requires an authenticated connection for every platform you want to schedule to, and each connection has its own permission structure. Getting this right the first time prevents publish failures and removes the need to re-authenticate accounts mid-campaign.
Navigate to Connected Apps and authenticate each platform
From your Canva homepage, click the account icon in the top-right corner and select Settings. In the left menu, find "Connected Apps" and click it. You'll see a list of platforms available for integration. Click the platform you want to connect, and Canva will redirect you to that platform's authorization screen.
Authorize Canva using the exact account you intend to publish from, not your personal account or a secondary one, since reconnecting mid-schedule breaks any posts already queued.
Follow these steps for each platform you're adding:
- Click the platform name under Connected Apps
- Log into the correct account when the authorization window opens
- Accept all permission requests the platform asks for, including read and write access
- Return to Canva and confirm the account name now appears as "Connected" in the app list
- Repeat for every platform you plan to use
Match account types to post types
Not every account type unlocks the same scheduling options, and this is where many users hit unexpected walls. Instagram personal profiles, for example, support fewer post types than Instagram Business or Creator accounts. If you're scheduling to LinkedIn, make sure you connect both your personal profile and your company page as separate connections, since they appear and publish independently inside the planner.
Here's a quick reference for account types that affect what you can schedule:
| Platform | Recommended account type | Why it matters |
|---|---|---|
| Business or Creator | Unlocks Feed posts and Reels scheduling | |
| Page admin account | Needed for Page-level publishing | |
| Personal + Company Page (separate) | Company page requires admin role | |
| Business account | Required for scheduled Pins |
Test each connection before you schedule
Once every account shows as connected, send one test post to each platform at a near-immediate time, within five minutes, so you can confirm the connection actually publishes. Check that the correct account name appears on the live post. This test takes less than ten minutes total and surfaces any permission gaps before you fill your calendar with content that won't go out.
Step 3. Schedule posts from the content calendar
Scheduling directly from the calendar view is the most efficient way to map out multiple posts across different platforms in a single focused session. Instead of opening individual designs and scheduling them one by one from the editor, the Canva content planner lets you initiate the entire process from the calendar itself, which keeps your workflow fast and your posting overview clear without constant tab switching.
Add a new post from the calendar view
Click any empty date slot on the calendar to open the post creation panel on the right side of your screen. From here, you have two options: select an existing Canva design from your recent files, or upload a file you've prepared outside of Canva. If you haven't built the graphic yet, you can start a new design directly from this panel, though finishing your designs first and batch-scheduling them in one session is the faster approach when you're planning an entire week at once.
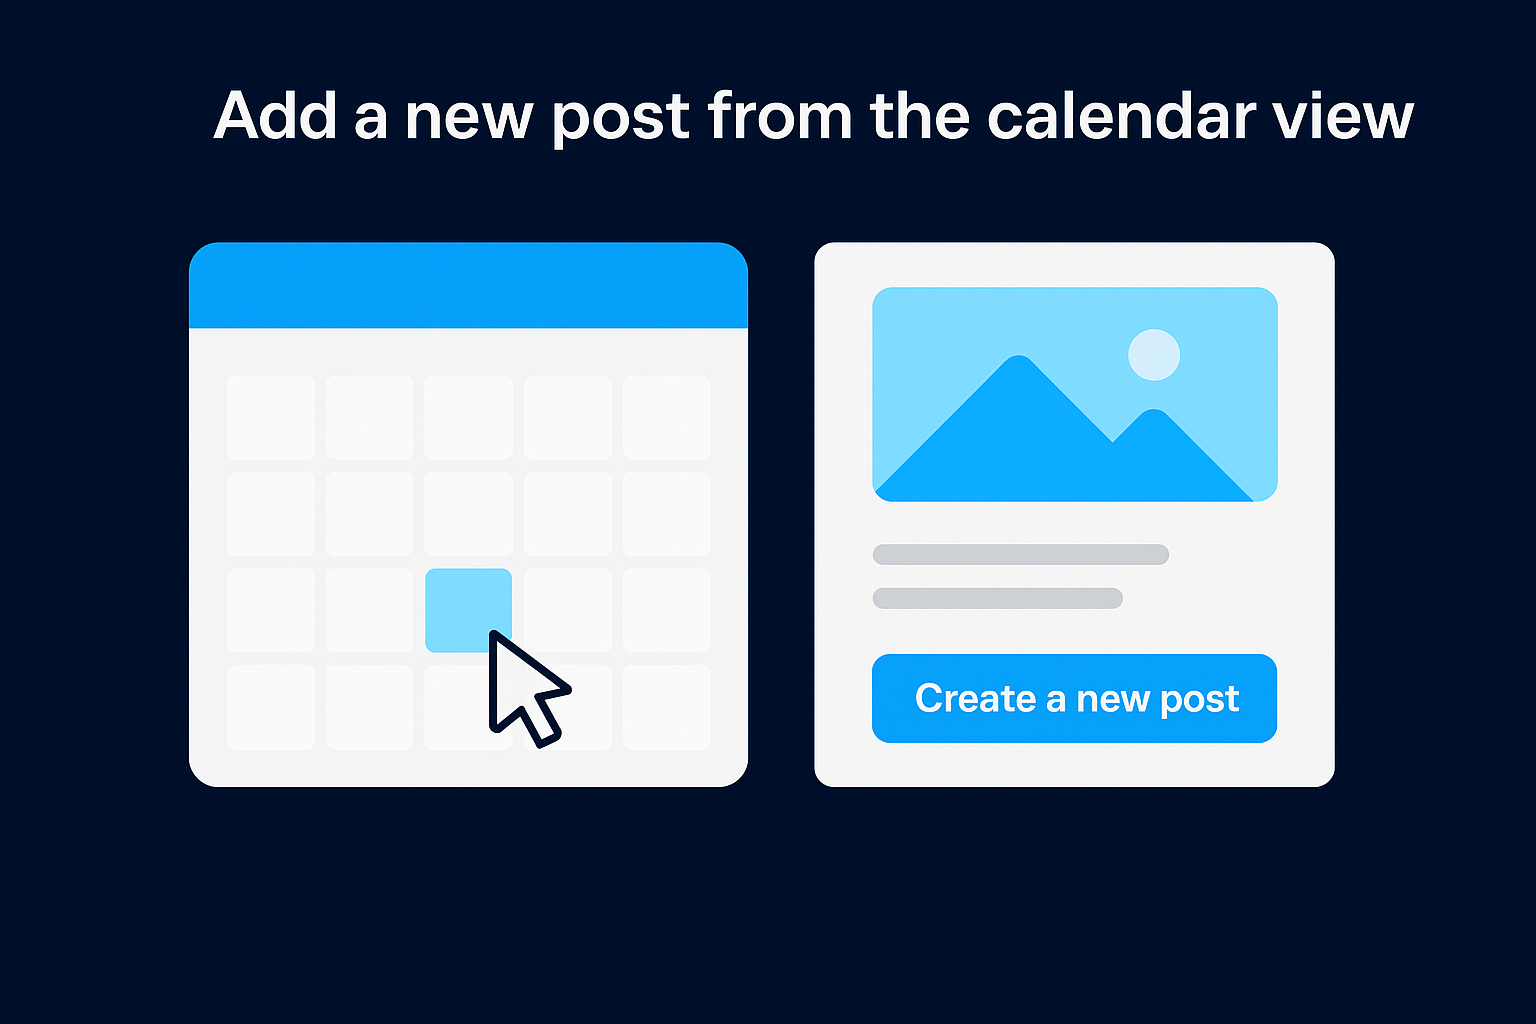
Follow these steps to add a post from the calendar view:
- Click the target date on the calendar grid
- Select "Create a new post" or "Choose existing design"
- Pick the social platform you want to publish to
- Add your caption in the text field provided
- Click "Next" to move to the scheduling confirmation screen
Set the date, time, and platform
On the confirmation screen, you'll see your design preview, caption text, selected platform, and time selector in one view. Adjust the scheduled time by clicking the time field and entering the exact hour and minute you want the post to go live. Canva uses the time zone you configured in your planner settings, so verify the time reflects your audience's local time, not your own, if those two differ.
Setting your time zone incorrectly is the most common reason posts publish at the wrong hour, so confirm it before you lock in any schedule.
If you want to publish the same design to multiple platforms at once, click "Add another platform" from this screen and select each additional destination. Each platform generates its own caption field, which lets you tailor copy for tone differences between platforms without duplicating the design file itself.
Review before confirming the schedule
Before you click "Schedule", scan through the preview one final time. Confirm the caption is complete and accurate, the correct account is selected for each platform, and the thumbnail matches the design you intended. Once you confirm, the post appears as a tile on your calendar showing the platform icon and scheduled time at a glance, so any mistakes in the queue are easy to spot before they go live.
Step 4. Schedule posts from the editor
Scheduling from the Canva editor is the most natural workflow when you're finishing a design and want to push it live without returning to the calendar view first. Instead of saving, navigating back to the Canva content planner, and locating the right date, you schedule directly from the design itself, which saves several steps when you're working on one post at a time.
Locate the "Share" and "Schedule" options
Once your design is complete, look at the top-right corner of the editor and click the "Share" button. A dropdown panel opens with several publishing options. Scroll down until you see "Schedule" listed as a separate option from "Publish." Click "Schedule" to open the scheduling panel on the right side of your screen without closing the editor.
This panel pulls directly from your connected accounts, so if a platform is missing here, go back and reconnect it through Settings before continuing.
Set your caption, platform, and publish time
The scheduling panel inside the editor gives you the same configuration options as the calendar view, just accessed from a different entry point. Select the platform you want to publish to from the dropdown menu, then write your caption in the text field below it. Keep the caption field specific and complete before moving on, since editing it after the post is queued requires reopening the item from the calendar view.
Follow these steps to fill out the scheduling panel correctly:
- Select your target platform from the account dropdown
- Type or paste your caption text, including any relevant handles or tags
- Click the date field and pick the publish date from the mini calendar
- Set the exact publish time using the time selector
- Click "Schedule post" to confirm and push it to your calendar queue
Confirm and push to the calendar
After you click "Schedule post," Canva confirms the action with a brief success message inside the editor panel. Your post now appears as a tile on the calendar on the date you selected, visible the moment you navigate back to the planner view. Check the calendar immediately after scheduling if you want to confirm the correct date, platform icon, and time appear on the tile without opening the full post details.
If you need to publish the same design to two or more platforms, repeat the scheduling panel steps for each additional account before leaving the editor. Each platform generates its own queue entry with independent caption copy.
Step 5. Manage drafts, edits, and troubleshooting
Once posts are in your queue, the Canva content planner does not lock them in permanently. You can go back, revise captions, swap designs, and remove posts before they publish, which gives you real flexibility when plans shift or content needs a last-minute correction before it goes live.
Save and revisit drafts
Canva saves unfinished designs automatically as you work, but a draft post in the planner is a different concept from a saved design. If you start the scheduling flow and close the panel before confirming, the design stays in your Recent Designs folder but is not queued on your calendar. To pick it back up, open the design from Recent Designs, navigate back to the scheduling panel inside the editor, and complete the process from where you left off.
Treat your Recent Designs folder as a staging area: designs sitting there without calendar tiles are not scheduled and will not publish on their own.
Edit or delete scheduled posts
Editing a post already in your queue is straightforward. Navigate to the calendar view, click the post tile on the date it is scheduled, and select "Edit" from the options that appear. You can update the caption, change the publish time, or swap the design entirely without deleting the post entry and starting over from scratch.
To remove a post, click the tile and select "Delete." The entry disappears from the calendar immediately. Your original design file stays in your Canva library untouched, so you can reschedule it later without rebuilding anything.
Fix common publishing failures
Failed posts appear in the calendar with an error indicator on their tile, usually a red badge or warning icon. The most common causes are expired platform tokens, revoked account permissions, or hitting your plan's monthly post limit. Work through this checklist when a post fails to publish:
- Reconnect the platform under Settings and then Connected Apps if the authentication token expired
- Confirm your account still holds the admin role required to publish on that platform
- Check that you have not exceeded your monthly scheduling limit for your current plan tier
- Verify the design file still exists in your library and has not been deleted or moved
- Retry the post by clicking the failed tile, selecting "Reschedule," and pushing it to a new time slot
Running through these five checks resolves most publish failures without needing to contact support, so keep this list accessible whenever your calendar shows an error state.
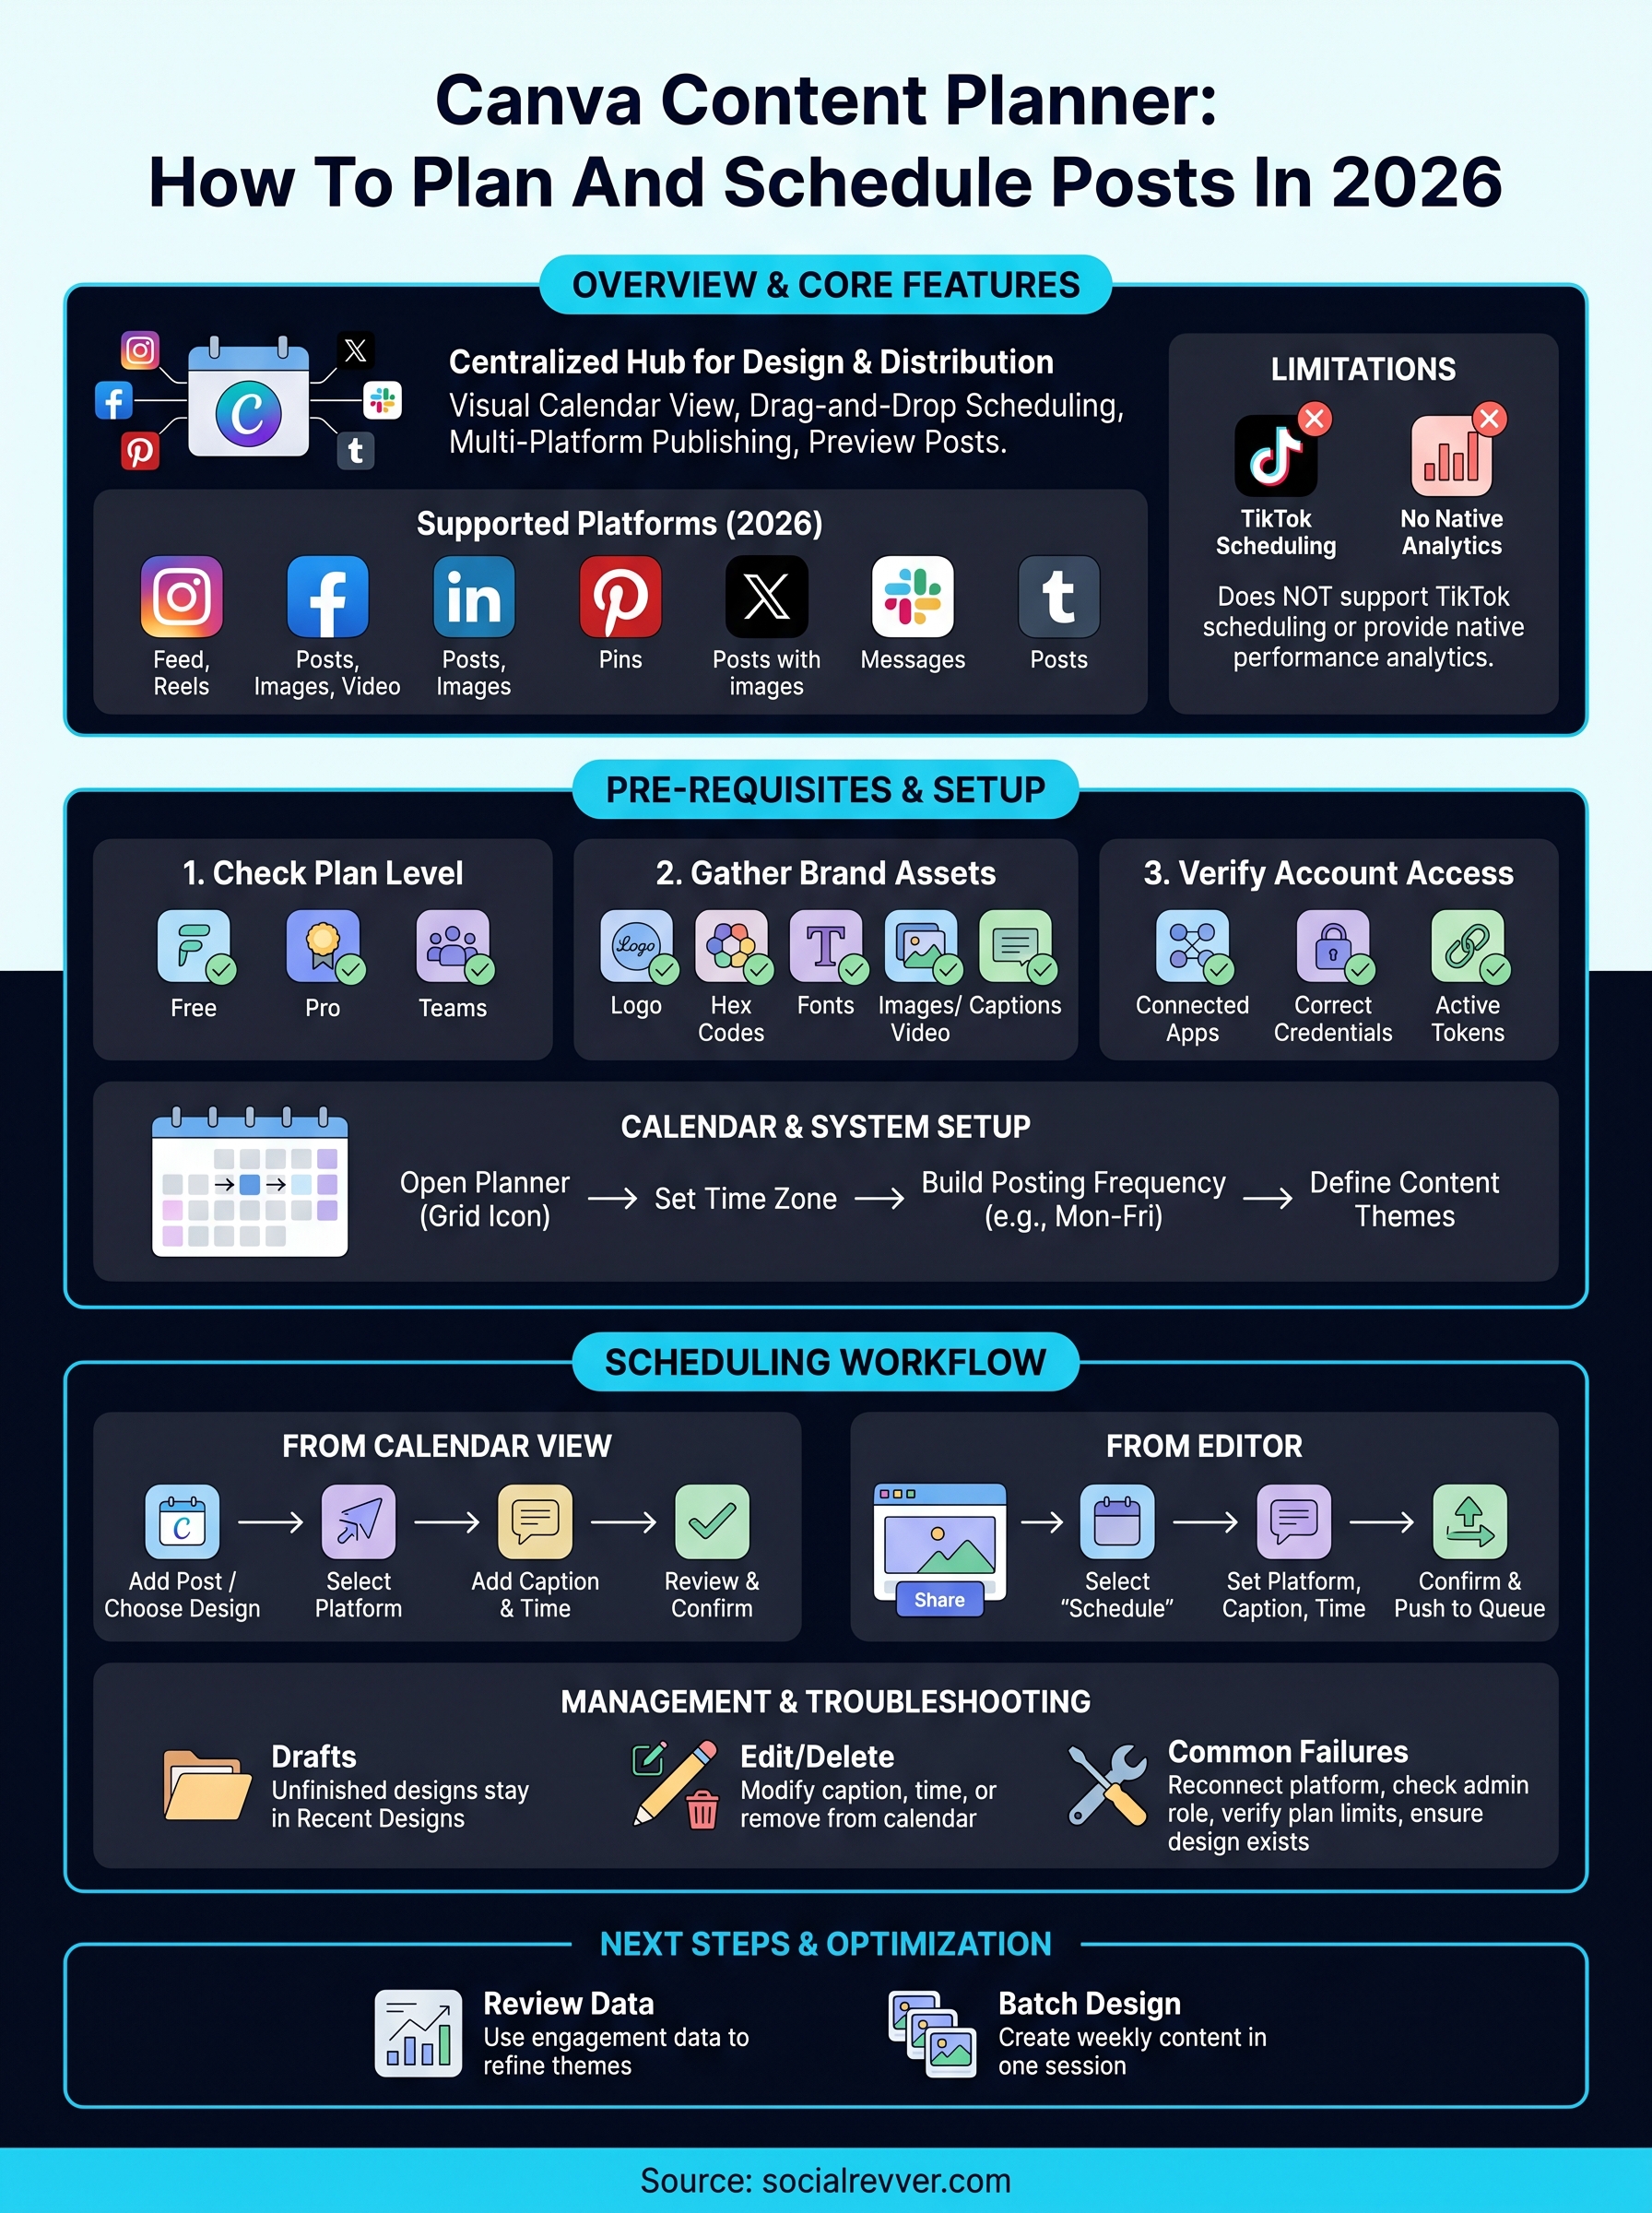
Next steps to keep posting consistent
The Canva content planner gives you a solid foundation for staying consistent, but consistency alone does not drive revenue. Getting your calendar filled is the starting line, not the finish line. Your next move is to treat each week's performance data as input for the following week's content, so your posting schedule becomes a genuine feedback loop instead of just a publishing checklist.
Start by reviewing which posts generated the most engagement each week, then use that data to refine your content themes and timing going forward. Batch your design work at the start of each month so you enter every week with your calendar already populated, which removes the last-minute scramble entirely. If you want a system that goes beyond scheduling and actually connects your short-form content to consistent inbound leads, apply for a free 40-slide social media strategy and see how SocialRevver builds the full engine for you.